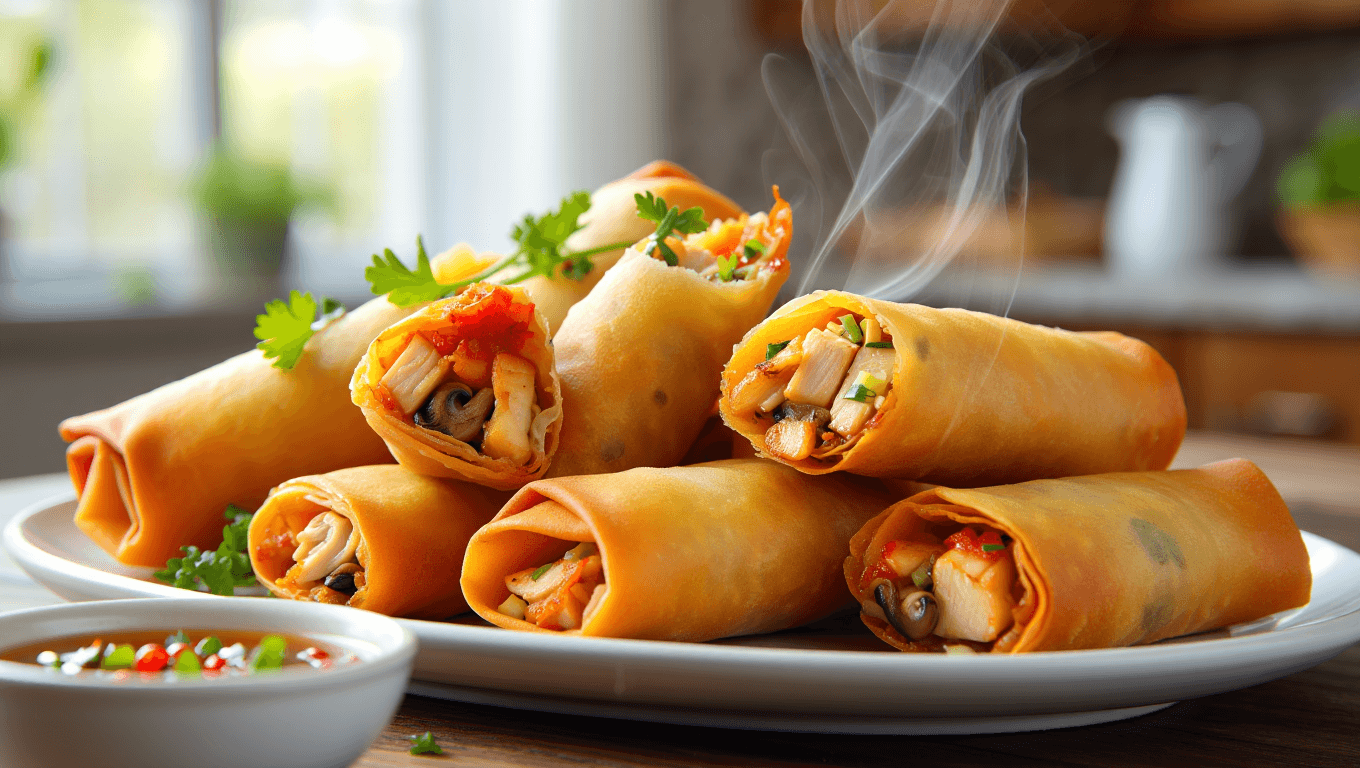
There is nothing quite as satisfying as the audible crunch of a perfectly fried spring roll, yet achieving that golden, shatter-crisp exterior at home can be surprisingly elusive. We’ve all dealt with the disappointment of a soggy, oil-laden wrapper or a filling that leaks mid-fry. Mastering Perfect Spring Rolls requires more than just a good recipe; it demands an understanding of moisture control and temperature management. In this guide, we will dive into the pro tips and essential techniques to ensure your spring rolls are consistently light, non-greasy, and incredibly crispy every single time you cook.
1. Choose the Right Wrapper
Not all wrappers are created equal. For that signature glass-like crunch, look for wheat-based “spring roll pastry” found in the freezer section. Avoid heavy egg roll wrappers or rice paper used for fresh rolls, as these will not produce the same light, crisp texture when fried.
2. Thaw Wrappers Properly
Patience is key when handling frozen pastry. Thaw the package completely in the refrigerator or at room temperature while still sealed. If you try to peel them while they are still slightly frozen, they will tear, leading to holes that let oil seep into your filling.
3. Keep a Damp Cloth Handy
Spring roll wrappers dry out within minutes of being exposed to air. Once the package is open, keep the stack covered with a clean, slightly damp kitchen towel. This prevents the edges from becoming brittle and cracking during the rolling process, ensuring a tight seal.
4. Squeeze Out Filling Moisture
The biggest enemy of a crispy spring roll is internal steam. After stir-frying your vegetable or meat filling, place it in a fine-mesh strainer. Use a spoon to press out every drop of excess liquid. A dry filling ensures the wrapper stays crisp from the inside out.
5. Let the Filling Cool Completely
Never wrap hot filling. The heat creates immediate condensation on the inside of the cold wrapper, making it gummy before it even hits the oil. Spread your filling on a large tray to cool to room temperature or chill it in the fridge for the best results.
6. Fine-Tune Your Vegetable Cut
Consistency matters for the perfect bite. Julienne your vegetables into thin, uniform matchsticks. This ensures they cook quickly and evenly during the brief frying time. Thick chunks of vegetables can poke holes in the delicate pastry, causing the roll to absorb excess oil.
7. The Cornstarch Slurry Secret
To prevent spring rolls from unraveling in the fryer, use a “glue” made of cornstarch and water. This mixture creates a much stronger bond than plain water or egg wash. Apply a small dab to the final corner of the wrapper to lock everything in place.
8. Master the Tight Roll
Air pockets are the enemy of a non-oily result. When rolling, pull the pastry firmly over the filling to eliminate gaps. Air pockets trap oil during frying and cause the rolls to expand and potentially burst, leading to a greasy, unappealing texture.
9. Don’t Overfill
It is tempting to pack the rolls, but less is more. Use about two tablespoons of filling per roll. Overfilling makes it impossible to get a tight seal and increases the risk of the wrapper tearing as the steam expands during the frying process.
10. Dust with Cornstarch
If you are making a large batch, lightly dust the finished, uncooked rolls with a tiny bit of cornstarch. This absorbs any surface moisture that might develop while the rolls sit on the tray, ensuring they stay dry and ready for the hot oil.
11. Choose an Oil with a High Smoke Point
For deep frying, you need an oil that can handle heat without breaking down. Peanut, canola, or vegetable oils are ideal. Avoid olive oil or butter, which have low smoke points and will impart a burnt flavor to your delicate spring rolls.
12. Use a Thermometer
Precision is the difference between greasy and crispy. Aim for an oil temperature between 350°F and 365°F. If the oil is too cold, the pastry absorbs it like a sponge; if it’s too hot, the outside burns before the inside is heated through.
13. Fry in Small Batches
Crowding the pan is a common mistake. Adding too many rolls at once drops the oil temperature significantly, leading to soggy results. Fry only 3–4 rolls at a time to maintain a steady, bubbling heat for that perfect golden finish.
14. The “Dry Entry” Technique
Before placing the rolls in the oil, double-check that there are no water droplets on the surface. Moisture causes the oil to splatter violently and prevents the pastry from sealing instantly, which is necessary to keep the interior oil-free and light.
15. Maintain Constant Motion
Once the rolls are in the oil, gently turn them frequently using tongs or a slotted spoon. This ensures even browning on all sides and prevents one side from becoming overly saturated with oil while resting on the bottom of the pan.
16. Drain on a Wire Rack
Never drain fried spring rolls on paper towels. While it seems logical, the rolls end up sitting in their own extracted oil, creating a soggy bottom. Use a wire cooling rack over a tray so air can circulate entirely around the roll.
17. The Vertical Drain Method
For the ultimate non-oily result, stand the spring rolls vertically in a wire basket or a narrow container lined with paper at the very bottom. This allows any residual oil to gravity-drain out of the ends rather than soaking back into the pastry.
18. Double Frying for Extra Crunch
If you want professional-grade crispiness, try double frying. Fry them once at a lower temp to cook the inside, let them cool, and then flash-fry them at 375°F for 30 seconds. This creates a remarkably hard, crunchy shell that stays crisp for hours.
19. Prevent “Sweating”
If you aren’t serving them immediately, do not cover the rolls with a lid or foil. Trapping the heat creates steam, which will turn your hard-earned crispy crust soft in seconds. Leave them uncovered in a warm oven if you need to hold them.
20. Reheating Done Right
If you have leftovers, avoid the microwave at all costs. To restore the crunch, place the spring rolls in an air fryer or a hot oven at 400°F for a few minutes. This draws out any moisture and crisps the wrapper back to its original state.
SEO Meta Description
Learn how to make Perfect Spring Rolls with our pro tips for 100% crispy and non-oily results. Master moisture control, oil temperature, and rolling techniques today!
Focus Keywords
- Perfect Spring Rolls
- Crispy Spring Rolls
- Non-oily frying tips
- Spring roll wrapper techniques
- Deep frying temperature
- Homemade spring rolls
FAQ Section
Q: Why do my spring rolls get soggy after frying? A: This usually happens because the filling was too wet or the rolls were drained on paper towels instead of a wire rack. Excess steam or trapped oil softens the pastry.
Q: Can I bake these instead of frying? A: Yes, though they won’t be as “shatter-crisp.” Brush them generously with oil and bake at 400°F, turning halfway through until golden brown.
Q: How do I stop my spring rolls from bursting? A: Ensure your filling is cool and dry, and roll them tightly to remove air pockets. Do not overfill the wrappers, as steam needs a little room to move.
Internal Linking Suggestions
- 10 Best Dipping Sauces for Homemade Appetizers
- The Ultimate Guide to Mastering Your Wok at Home
- Easy Vegetable Stir-Fry: The Perfect Base for Any Meal
Conclusion
Achieving Perfect Spring Rolls is a rewarding culinary skill that balances prep work with frying precision. By focusing on moisture removal, maintaining a tight roll, and monitoring your oil temperature, you can eliminate greasiness and enjoy that signature crunch. Whether you are hosting a dinner party or prepping a weekend snack, these pro tips ensure your results are always golden and delicious. Ready to start cooking? I can help you create a custom dipping sauce recipe to pair with your crispy rolls!